
【cloudcore】debianをインストールした
問題
KDDIウェブコミュニケーションズさんのVPS cloudcore、使いたいけど、OS選択がまだできない(2012/02/18現在)。
debian使いたいぞー。
![]()
解答例
わりとすんなりできた。
1,2,3,4までは、外からsshでもできる。5からはコントロールパネルのリモートコンソールから。
1、debianのネットワークインストーラーをダウンロード
このへんから netboot → netboot.tar.gz を取ってくる。
# wget http://ftp.nl.debian.org/debian/dists/squeeze/main/installer-amd64/current/images/netboot/netboot.tar.gz
--2012-02-17 23:40:04--  http://ftp.nl.debian.org/debian/dists/squeeze/main/installer-amd64/current/images/netboot/netboot.tar.gz
ftp.nl.debian.org をDNSに問いあわせています... 130.89.149.21, 2001:610:1908:a000::149:21
ftp.nl.debian.org|130.89.149.21|:80 に接続しています... 接続しました。
HTTP による接続要求を送信しました、応答を待っています... 200 OK
長さ: 9353019 (8.9M) [application/x-gzip]
`netboot.tar.gz.1' に保存中

100%[==========================================================================================================>] 9,353,019    963K/s 時間 14s

2012-02-17 23:40:19 (640 KB/s) - `netboot.tar.gz.1' へ保存完了 [9353019/9353019]
2、解凍する
解凍先を作って、そこに解凍。
# mkdir /boot/debian
# tar zxf netboot.tar.gz -C /boot/debian/
参考までに、解凍先ディレクトリの状況。
# ls -la /boot/debian/
合計 20
drwxr-xr-x 3 root root 4096  1月 23 02:51 .
drwxr-xr-x 4 root root 4096  2月 17 23:42 ..
drwxr-xr-x 3 root root 4096  1月 23 02:51 debian-installer
lrwxrwxrwx 1 root root   33  2月 17 23:43 pxelinux.0 -> debian-installer/amd64/pxelinux.0
lrwxrwxrwx 1 root root   35  2月 17 23:43 pxelinux.cfg -> debian-installer/amd64/pxelinux.cfg
-rw-r--r-- 1 root root   66  1月 23 02:51 version.info
3、GRUB(ブートローダー)にdebianのインストーラーが起動できるように設定
赤文字部分を追記。title はなんでもよい。kernel と initrd のパスは間違えないように。
# grub.conf generated by anaconda
#
# Note that you do not have to rerun grub after making changes to this file
# NOTICE:  You do not have a /boot partition.  This means that
#          all kernel and initrd paths are relative to /, eg.
#          root (hd0,0)
#          kernel /boot/vmlinuz-version ro root=/dev/vda1
#          initrd /boot/initrd-version.img
#boot=/dev/vda
default=0
timeout=5
#serial --unit=0 --speed=115200
serial --unit=0 --speed=115200 --word=8 --parity=no --stop=1
terminal --timeout=10 serial console
title debian squeeze
        root (hd0,0)
        kernel /boot/debian/debian-installer/amd64/linux ro root=LABEL=/ console=tty0
        initrd /boot/debian/debian-installer/amd64/initrd.gz
title CentOS (2.6.18-274.18.1.el5)
        root (hd0,0)
        kernel /boot/vmlinuz-2.6.18-274.18.1.el5 ro root=LABEL=/ console=tty0 console=ttyS0,115200n8
        initrd /boot/initrd-2.6.18-274.18.1.el5.img
title CentOS (2.6.18-238.el5)
        root (hd0,0)
        kernel /boot/vmlinuz-2.6.18-238.el5 ro root=LABEL=/ console=tty0 console=ttyS0,115200n8
        initrd /boot/initrd-2.6.18-238.el5.img
4、再起動
# reboot
5、インストーラー起動
無事起動するはずなのだが、失敗したかと思うぐらい待たされたり、いろいろあるようなので、あわてずあきらめず進める。
Press any key to continue.
Press any key to continue.
Press any key to continue.
Press any key to continue. (何かキーを押してください の意)
Press any key to continue.
(適当にEnterキーでも押す)

画面は進んでいき、途中で固まったようになる。

たぶん放っておけばよい。

リモートコンソールをうっかり閉じてしまったりしても、また開けばよい。
その際、何かの準備中なのか、しばらくは接続ができないので、
数分~10分ぐらい、気長に待ちながら再接続を試みる。

どうにもおかしかったら、コントロールパネルから再起動等を試したりしても大丈夫なはず(意味があるかどうかは不明)。
6、インストールを進める
ここまでくれば、いつもどおりのインストール作業。
ネットワークの設定があるので、そこではコントロールパネルのダッシュボードに書いてある仮想サーバー情報を書き写す。
ディスクのパーティションを決めたり、ユーザー、パスワードを決めたり、最初にインストールするパッケージを指定したりして進める。
外からsshを最初からできるようにしたかったら、インストールしたいパッケージの選択のときにsshサーバーも選択しておくこと。


7、debian起動
インストールが済んだら、debian起動。ここもほぼ問題なし。

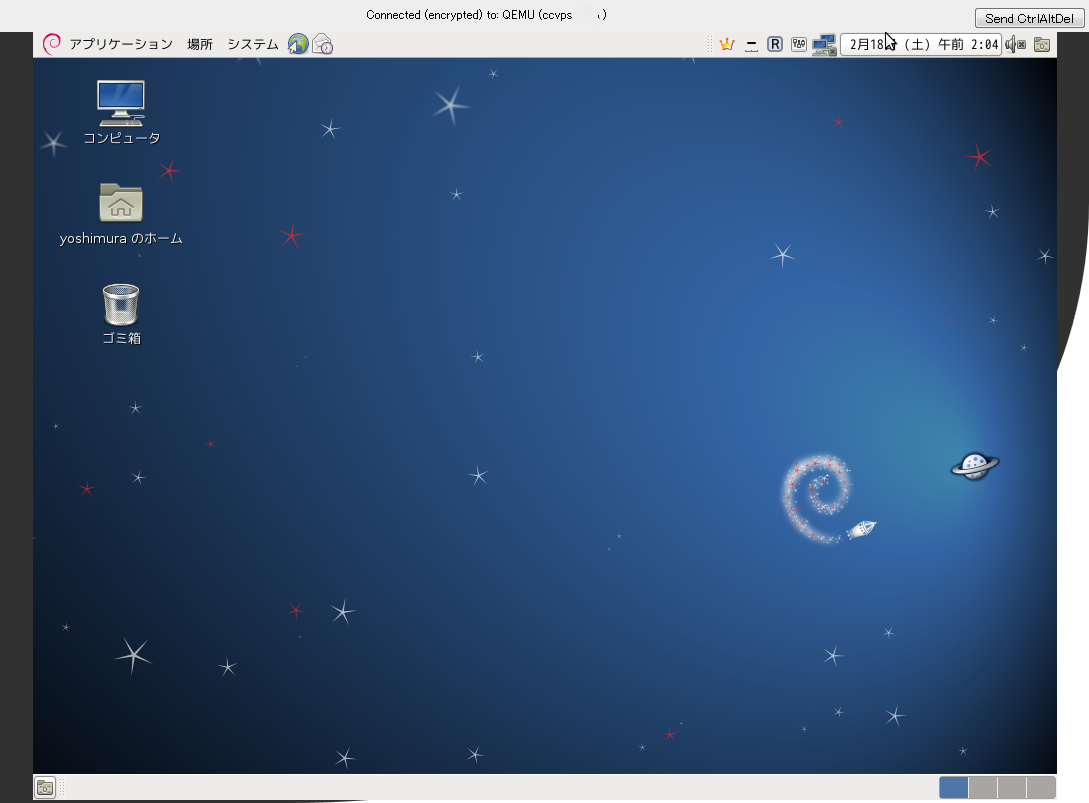
8、デスクトップ環境も動く
コントロールパネルのリモートコンソールのVNCでは、マウスの位置があわなかったり、画面が狭かったりするので、デスクトップ環境も快適に使いたい場合は、このあとVNCサーバーをインストールしてVNCクライアントから接続して使えるように設定すればよい。
![]()
コメント